Operation
The HTML page containing the confirmation message is free. Once in place, the platform locates the different variables defined in the form parameters and present in the source, and replaces them with the values entered in the form by the user (Note: the variable corresponding to the validate button is not relevant in this page).
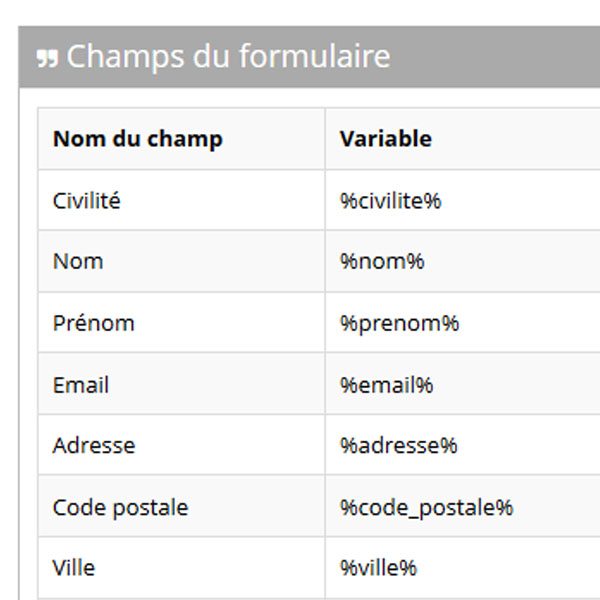
The variable name is generated from the name chosen for the fields (the variable is surrounded by the % character and the special characters in the name are replaced).
The name of the variables is displayed in column number 2 in the settings page.
You also have the option to choose to redirect your prospects directly after the form is validated.
To do this you must check the redirect box and simply indicate the URL of the page you want to redirect.

Simple example
Following the example given in the form page, we have declared several fields:
The following HTML source has been placed in the form page:
<table border="0">
<tr>
	<td>Civilité</td>
	<td width="120">%civilite%</td>
</tr>
<tr>
	<td>Nom</td>
	<td width="120">%nom%</td>
</tr>
<tr>
	<td>Prénom</td>
	<td width="120">%prenom%</td>
</tr>
<tr>
	<td>Email</td>
	<td width="120">%email%</td>
</tr>
<tr>
	<td>Adresse</td>
	<td width="120">%adresse%</td>
</tr>
<tr>
	<td>Code postal</td>
	<td width="120">%code_postal%</td>
</tr>
<tr>
	<td>Ville</td>
	<td width="120">%ville%</td>
</tr>
</table>
Once the form is validated, the variables between the % sign are interpreted by the platform which generates the following HTML source code (the values entered are given as an example. The real values entered by the user are displayed):
<table border="0">
<tr>
<td>Civilité</td>
<td width="120">Monsieur</td>
</tr>
<tr>
<td>Nom</td>
<td width="120">Dupont</td>
</tr>
<tr>
<td>Prénom</td>
<td width="120">Jean</td>
</tr>
<tr>
<td>Email</td>
<td width="120">test@test.com</td>
</tr>
<tr>
<td>Adresse</td>
<td width="120">54 rue Louis Rolland</td>
</tr>
<tr>
<td>Code postal</td>
<td width="120">92120</td>
</tr>
<tr>
<td>Ville</td>
<td width="120">Montrouge</td>
</tr>
</table>
To create your confirmation page
Import a URL
Checking the HTML page and related elements
The HTML page must be "well formed". If the HEAD and BODY tags (and STYLE if you are using CSS) are not present, the import will not be done correctly. If you use a Dreamweaver-type HTML editor to create your pages, these tags are always present.
Links to other pages (e.g. on a website) must be absolute.
The links to the images to be imported must be absolute.
If a file to be downloaded is linked to the HTML page (a PDF file for example), check that the link is absolute.
Import of the URL
Copy the URL of the page into the MDWorks interface. After importing, check the content of the message body and style sheets.
In case of problems
If the body of the message is empty, check that your page contains <body> and </body> tags.
If the body of the message contains strange characters instead of accents, check that the charset of your page is in ISO-9001 (and not UTF-8).
Import a ZIP file
An HTML page can be imported with its images.
Checking the HTML page and related elements
The HTML page must be "well formed". If the HEAD and BODY tags (and STYLE if you are using CSS) are not present, the import will not be done correctly. If you use a Dreamweaver-type HTML editor to create your pages, these tags are always present.
Links to other pages (e.g. on a website) must be absolute.
The links to the images to be imported must be relative.
If a file to be uploaded is linked to the HTML page (a PDF file for example), it will also be imported and hosted by this method. Check in this case that the link is relative.
Creating the ZIP file
To create the ZIP file, select directly the HTML page and the linked elements (images, directory, ...). Do not select the directory containing all this. The HTML page must be "at the root" of the ZIP file.
In case of problems
If the body of the message is empty, check that your page contains <body> and </body> tags.
If the body of the message contains strange characters instead of accents, check that the charset of your page is in ISO-9001 (and not UTF-8).
Source
You can set up your confirmation page using the source code.
HTML editor
The confirmation page can be created using the online HTML editor.
The places where the values entered by the user should be placed must also be replaced by the variables between %..
Editing style sheets
Setting up the HTML source by importing a URL or a ZIP file, automatically fills in the stylesheet part according to the elements available in your original page.
However, you can modify the style sheets by hand to change the presentation.
This post is also available in:
 Français (French)