Sending domains
The Account management → Sending domains page lets you declare the domain names you send your campaigns from, and check that they are correctly authenticated. This authentication is what makes the difference between a message that lands in the inbox and a message that goes to spam: mailbox providers verify that the sender is actually authorised to use the domain it displays.
Three mechanisms are involved, and each can be summed up in one sentence. SPF lists the servers authorised to send emails for your domain. DKIM adds an electronic signature that proves the message has not been altered in transit. DMARC tells mailbox providers what to do with messages that fail the two previous checks. You do not need to know more than that: the page gives you what to copy, where to paste it, and how to check that everything is fine.
The DNS records to publish
The blue panel at the top of the page lists the records to publish, with four columns: Type, Record, Name and Value.
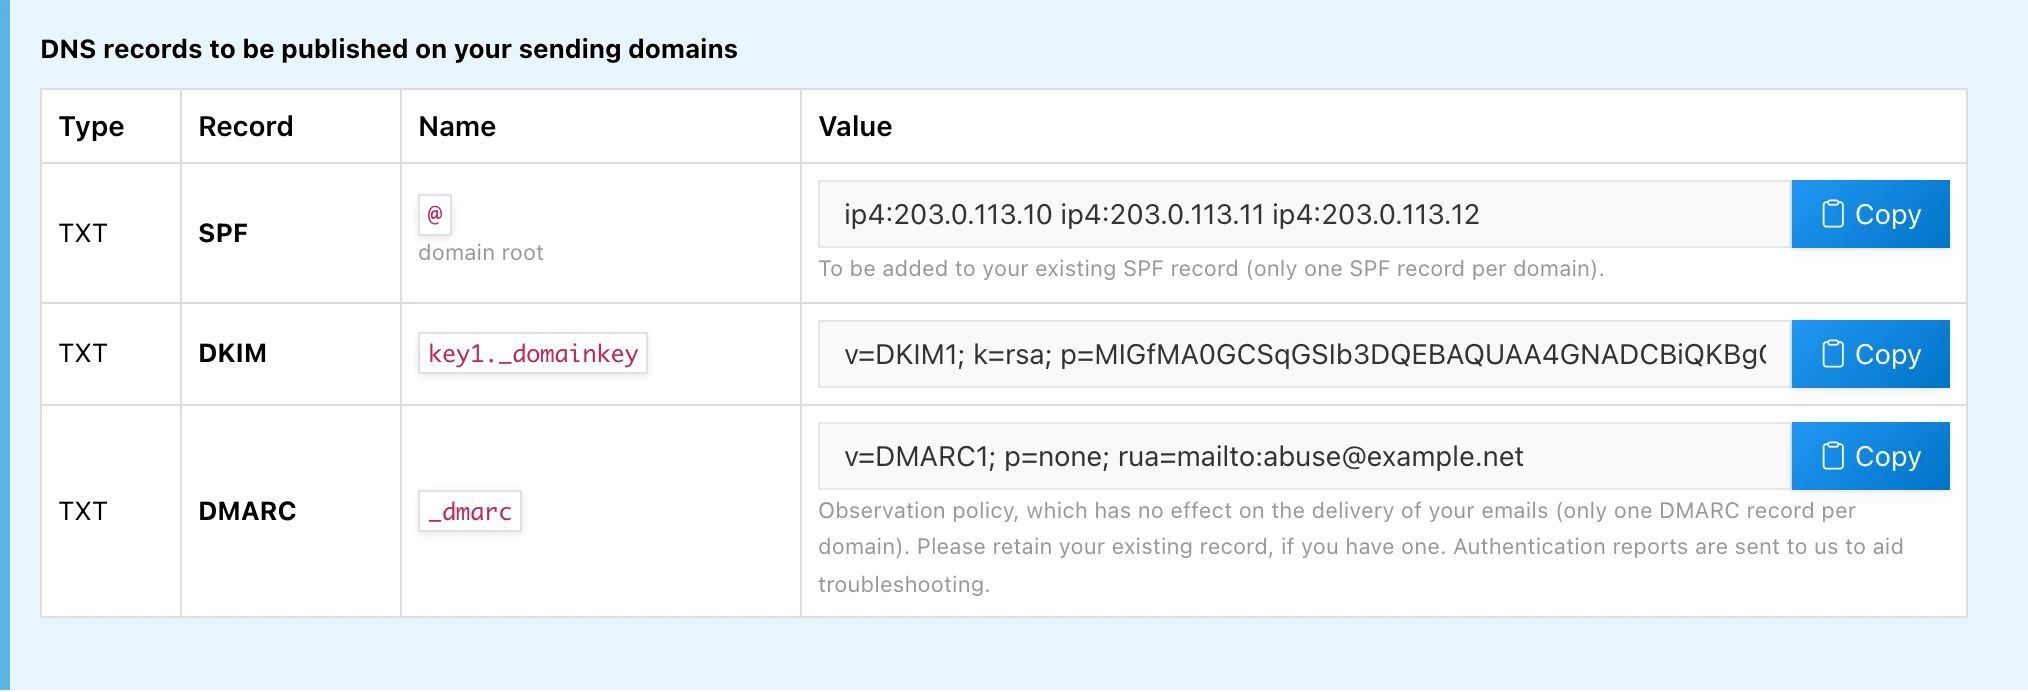
These records are entered with the hosting provider of your domain name (OVH, Gandi, Cloudflare…), in the DNS zone. If your IT provider manages your domain, you can forward them the table as is: it contains everything they need.
Always use the Copy button next to each value. A DKIM key is about 400 characters long; retyping it by hand gives you a broken configuration every single time.
Only one SPF record per domain. If your domain already has an SPF record, which is the case as soon as you use Google Workspace or Microsoft 365 for example, do not replace it: your entire email system would stop working. Simply add the ip4: mechanisms provided by the page inside your existing record.
In practice, if your current SPF looks like:
v=spf1 include:your-mail-provider.example ~allit becomes, after adding the ip4: mechanisms shown on screen:
v=spf1 include:your-mail-provider.example ip4:... ip4:... ~allA single record, which authorises both your email system and your campaigns.
p=none): it has no effect on the delivery of your messages, it only reports. The generated reports are sent to us, which lets us diagnose a possible deliverability problem.The status table of your domains
Below the panel, a table shows one row per domain with the columns Reputation, SPF, DKIM, DMARC and the date of the last check.

For the SPF, DKIM and DMARC columns:
| Display | What it means |
|---|---|
| OK | the record is published and correct, nothing to do |
| Error | the record is missing or incorrect; the detail shown under the label tells you what to fix |
| not verifiable | the check does not apply to your account (see the special cases below) |
| not checked | the check has not been run yet |
The Reputation column measures something else: whether your domain appears on blocklists used by mailbox providers, not the quality of its configuration. A domain can be perfectly configured and have a degraded reputation, and the other way around.
| Display | What it means |
|---|---|
| Good | the domain does not appear on any blocklist |
| Average | listed on a blocklist of moderate severity |
| Degraded | listed on a high-impact blocklist |
| - | domain not monitored, or awaiting its first check |
When the reputation is Average or Degraded, the names of the lists involved are displayed. In that case, contact support: removal from a blocklist follows a procedure specific to each list, it is not a self-service operation.
Adding a domain
The Add a sending domain button opens the declaration form. Once the domain has been added, our support team is notified automatically and the DKIM signature is activated on our side. If you have published the DNS records, your domain is operational within 24 hours.
Rechecking after a change
After publishing or fixing your records with your hosting provider, click Recheck all to run the checks again.
Keep in mind that a DNS change is not instant: depending on the provider, it takes from a few minutes to several hours before it is visible everywhere. An “Error” right after a change is therefore not necessarily an error, it is often a matter of patience. Check again a little later before looking for a problem.
The special cases
The first row of the table is the sender domain provided by the platform, marked with the “Default domain” badge. It is managed by our team, cannot be deleted, and its status is normally always green.
Some accounts see “not verifiable” on SPF and DKIM. This is normal: their emails are sent through a third-party provider that handles the signature itself. It is not an anomaly and there is nothing to fix.
The page is not visible on SMS-only accounts: it only applies to email.
If something goes wrong
A check still shows Error more than 24 hours after you published your records? In order:
- Check with your hosting provider (or your IT provider) that the records are actually saved in the DNS zone, with no typo in the Name field.
- Run the checks again with Recheck all.
- If the error persists, contact support with the domain name concerned: the detail shown under the failed check helps us diagnose it quickly.